HIPAA File Viewer

HIPAA File Viewer (for 5010 and 4010) allows you to view multiple HIPAA files simultaneously. It parses both 4010 and 5010 files and recognizes the following files:
- 837 P,D,I Health Care Claim, Professional, Dental, and Institutional
- 835 Health Care Claim Payment/Advice
- 834 Health Care Benefit Enrollment and Maintenance
- 820 Payment Order/Remittance Advice
- 278 Health Care Services Review Request/Response
- 276/277/277CA Health Care Claim Status Request/Response
- 270/271 Health Care Eligibility Benefit Inquiry/Response
Installation
Download the trial program at Download page. Follow on screen instructions to install the software. Windows may warn you about the danger of installation 3rd party software. We assure you that our software does not have any virus, bloatware, or Popup Ad.
This trial program will become the full version program after you activate the program with purchased license.
License
This is a licensed software. It runs in trial mode when no license is activated. You can run the trial program for free to make sure it fits your requirements. However, the program only displays first 10 records of the file. It also scrambles data in the file so do not use it in production. Click here for difference between a trial program and the licensed program.
If you decided to purchase a license, please go to Shopping page..
Program Quick Start
How to start the program
Look for an icon labeled "HIPAA Viewer" on your Desktop after successful installation. Double click on the Icon to start the program.
Open a HIPAA File
Use the File menu, then Open sub-menu to select a file on your computer. Viewer automatically detects the format of the file and displays its contents on screen. Pay attention to the selected tab in the right pane. The default display is “Segment Data” tab which shows data elements in the selected segment on the left pane. If you select (by clicking on) a different segment in the left pane, right pane will be automatically updated to show the correct data elements.

The "HIPAA Data" tab displays common data fields defined in the HIPAA standard.

If the program fails to recognize the file format, it will ask you to select the file type by displaying this window:
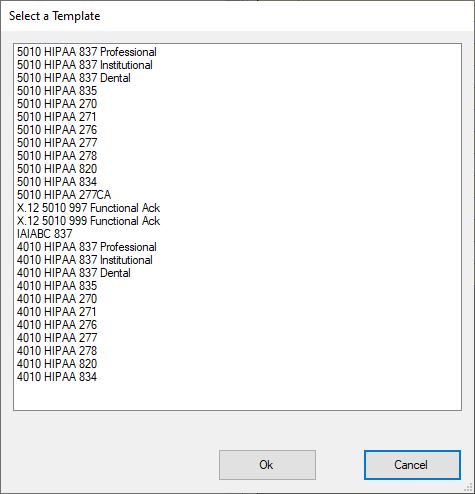
It will try to parse the file based on the format you selected.
Search Text
You can search a text string in the currently open file by using Tool -> Find menu (or Ctrl-F key combo) to open the search dialog box:

Type in the search string and check, or uncheck, the “Match Case” box. Click “Search Next” button to start the search.
Viewer starts searching from the currently selected data segment in the left pane. If there is no selected segment, Viewer starts searching from the beginning of the file.
When Viewer finds a match in a segment, it highlights the segment in the left pane and displays the data elements in the right pane.
If you want to search again after a match is found, click the “search next” button again. The search starts from the next segment following the current segment where the match was found.
Warning…
If you have two matches on the same segment, in the same data element or different data element,
View will only locate the data segment once. Viewer will start searching from the next segment
even if the segment has two matches of the searched string.
Option
The default file extension is set to *.txt. If your file extension is not txt, you can use the dropdown box to display all files (*.*). You can change the default file extension in the Option menu.
